

How to plant plums in spring and summer: methods and rules for beginners
Wanting to improve the characteristics of a long-growing crop or to cultivate a wild boar that has accidentally grown from a bone, gardeners often decide to plant a fruit tree.
What do you need to know about plum grafting?
Next, we will consider the basic rules and methods of grafting plums on plums and other stone fruit crops.
Content
- 1 Why grafting plums: benefits and objectives of grafting
- 2 When to plant plums in spring and summer: optimal timing
- 3 What trees can be grafted with a plum: suitable grafts
- 4 Rules for the selection and storage of a scion for grafting plums
- 5 Rules and recommendations for the plum grafting procedure
- 6 Plum grafting methods
- 7 Plum care after vaccination
Why grafting plums: benefits and objectives of grafting
As a rule, the main goal of grafting is to get a tree that is more resistant to negative factors.
However, the benefits of plum grafting do not end there. Here are the purposes for which it can be produced:
- Would you like to cultivate the wild and plant a varietal plum on it (in other words, multiply it).
- Not satisfied with the planted variety, and you want to re-graft it to a more suitable one.
- You have a compact (small) area, and you want to have several varieties on one tree at once.
- Accelerate fruiting.
- Save the tree (if the bark is damaged by hares or mice).
- Propagate or save a favorite or just a rare variety.
When to plant plums in spring and summer: optimal timing
Spring grafting of plums can be done as in early spring before the start of sap flowwhen the buds are in a dormant state, and already during the growing season (active sap flow).
Note! Terms of vaccination depend on which one method you are going to plant a plum.
When to plant plums in spring?
Depending on your region and its climate, the vaccination is usually carried out from March in the southern regions to early May (in the Middle Lane). However, first of all, you should rely on the weather conditions of the current season and the condition of the tree.
In this case, the air temperature should already be positive regardless of the time of day, since prolonged subzero temperatures often lead to the rejection of the scion.
Note! And here is the plum grafting method budding (with an eye) is completely performed in the summer. More precisely, it must be carried out late July-early August, when the buds on the growths of this year are already ripe, and the growth of shoots will practically stop.
As for whether when is it better to harvest grafting material, is it possible to do this in the spring (immediately before vaccination) - we will analyze these and other issues in more detail later in a separate paragraph.
Short answer! Cuttings (scions) can also be cut in the spring, before the buds begin to bloom, but there is always the possibility of freezing. Therefore, it is better to harvest cuttings in autumn or early winter, before the onset of severe frosts, and store them until spring.
What trees can be grafted with a plum: suitable grafts
The best option for crossing a fruit tree is to graft a plum on a plum or on its wild.
In the case when there is no suitable stock of one species (genus), the plum is grafted onto others stone fruits the cultures best suited for this:
- cherry plum;
- turn;
And also thorny.
- felt cherry;
- apricot (although, as a rule, they do the opposite).
Video: grafting plum on cherry plum in the split
Good stock parameters
As rootstock ideally it's better to use young 1-2-3 year old seedlings, it is considered the best option for grafting plums.
Important! Grafting of young seedlings, as a rule, is carried out at a height of 3 to 25 cm from the surface of the earth, it is possible even almost above the root collar itself. The lower the grafting, the better the accretion, the closer the roots, and the more powerful the seedling will grow.
But older trees are also suitable (in this case, as a rule, they are grafted onto their skeletal branches, but there are exceptions), while preferably not older than 10 years.
However, it should be borne in mind that the survival rate of cuttings (grafts) on a very old bark (rootstock) has very low rates.
Naturally, in the conditions of the same Middle zone (Moscow region) and other cold regions for rootstock use the most winter hardy varieties.
Of course, the rootstock tree must be in good condition: be healthy, have no damage or disease, have increased endurance both to weather conditions and to various diseases.
As for the choice of a specific branch, it is better to graft at the base of skeletal branches, at a distance of 20-40 cm from the trunk. In this case, the stock should be directed upwards or tends to be vertical. These are the branches grow much better, which means that the success of the survival of the cuttings is significantly increased.
As a rule, annual cuttings (grafts) are grafted onto annual shoots (rootstocks). they are of the same diameter.
Rules for the selection and storage of a scion for grafting plums
Next, we will consider how to properly prepare the scion in the fall and save it until the spring grafting of the plum.
What should be a quality scion
A high-quality graft is the key to a successful vaccination!
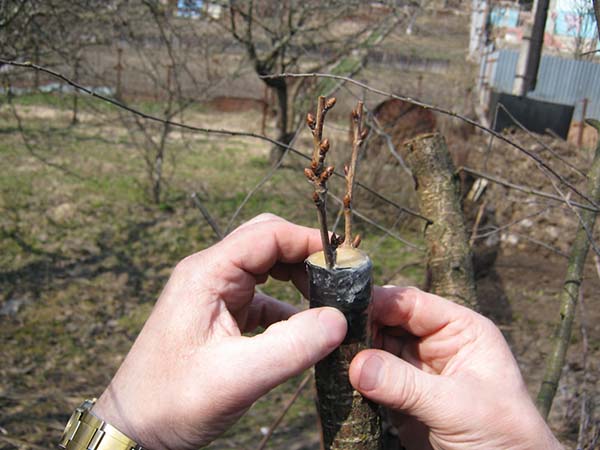
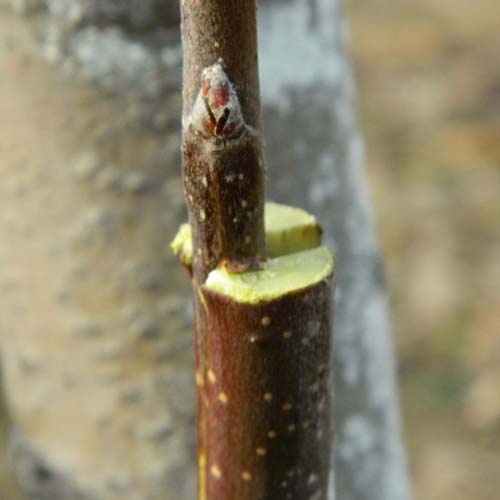
For grafting plums, you should prepare scion cuttings that need to be cut from annual (in rare cases, two-year) branches, at the top of the crown with south or west side, and it is from the middle part of the shoot. The cut itself is carried out on the annual ring between the growth of the last and this year. As for their quantitative characteristics, then quality grafts should be diameter 5-8 mm (with a pencil) and length 20-40 cm (already directly during vaccination, cut to the recommended number of kidneys - 2-3).
Cuttings should have exactly vegetative buds, rootstocks with fruit buds cannot be used.
The grafting material should look fresh, free of frost and damage. Therefore, before vaccination, it is recommended to make sure of its quality without fail. It is very simple to check this - on the cut, the cuttings should be as light (green) as possible.
Important! One of the popular ways to determine the viability of the grafting cuttings is to bend it. If this was done easily, then the scion (stalk) is quite suitable for the procedure.
Directly during the vaccination procedure prepare the stalk (cut), leaving 2, maximum - 3 buds on it (optimally - still 2).
When to harvest and how to store cuttings (scions)
Despite the fact that pruning trees in the autumn is undesirable, it is most convenient to harvest cuttings at this time. Therefore aboutscions (cuttings) it is worth taking care in advance and preparing them in the fall, before the onset of stable frosts.
However, this can also be done shortly before the vaccination procedure itself, during the annual spring pruning plum.
But in this case, you need to be sure to have time before the beginning of sap flow (swelling and even more blooming buds), while the tree is still dormant.
Video: grafting cuttings - how, where and when to cut
Storage
After the autumn harvesting of cuttings, they must be kept in good condition until spring and prevent premature start of the growing season.
The best way to store cuttings is wrap them in a damp material (cloth), and even better in moss or sawdust and put in a perforated bag.
In addition, they can be stored outdoors, digging in the yard (if you are more alive in a private house), under the snow.
The main thing - keep the temperature low... Therefore, storage will go basement, cellar or refrigerator, in other words, a place where the temperature is kept in the region of 0 .. + 4 degrees.
Advice! Without fail (at least once a month), you should periodically take out and inspect the cuttings (future grafts) for mold or fungus damage.
Rules and recommendations for the plum grafting procedure
- It is imperative to observe the compatibility of trees (rootstocks and scions) with each other.
- Perform the operation (vaccination) at the correct time and under favorable weather conditions.
If you are planting in early spring, the weather should already be warm, but not dry and hot. There should be no rain a few days before the day of the vaccination.
- The vaccination procedure itself is best done in the morning.
- It is better to choose a place for grafting (on the rootstock) from the north side, in order to subsequently avoid direct sunlight (then you will not have to shade).
Important! It is undesirable to vaccinate from the south side of the tree, since the scorching rays of the sun will dry out the graft site, and the graft may not take root.
- Before carrying out the operation, be sure to wipe the graft site (rootstock branch) with a cloth.
- The success of the grafting largely depends on how smoothly you cut the cuttings (scions). They should be perfectly smooth, without any bends or roughness.
By the way! As a rule, the length of the bevel cut should be 3 times the diameter of the cutting (scion).
- The diameter at the grafting site at the rootstock and the scion should ideally be the same. However, if the stock is thicker than the scion, then in this case you need to move the scion to one of the edges, thereby aligning the cambial layers.
Note! It makes no sense to use a scion of a larger diameter than the rootstock, as well as to put a smaller scion in the middle of the rootstock. in this case, there will be no contact of the cambium, which means that the vaccine simply will not take root.
- It is necessary to carry out the operation quickly so that the surfaces of the sections do not have time to oxidize and dry out.
- During the vaccination procedure, in no case should you touch the slices with your hands, so as not to accidentally introduce an infection.
- The same applies to the instruments used: they must be not only sharp, but clean (disinfected), otherwise an infection may get on the cut.
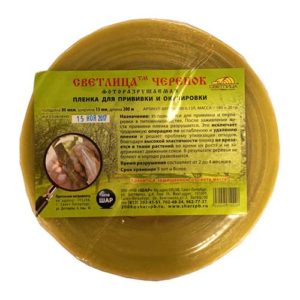
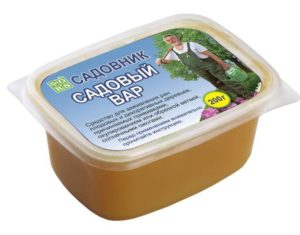
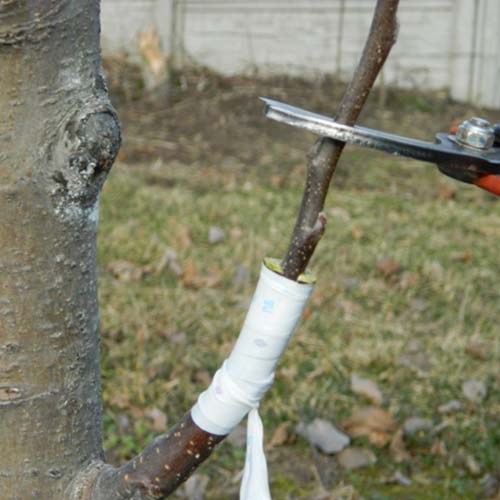
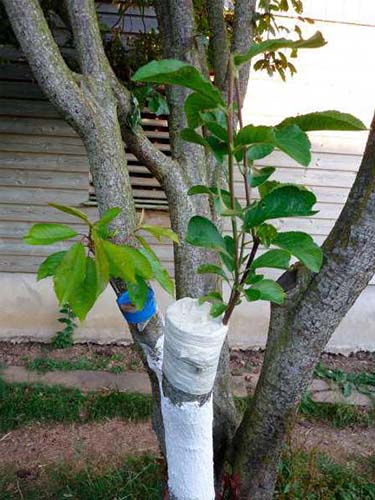
- The vaccination site must be wrapped as much as possible (optimally with a polymer film, but you can also use electrical tape or special tape) and cover the open parts of the graft and the cut off top of the cutting (scion) with garden pitch.
This measure is necessary to protect the vaccination site from drying out, as well as to isolate it from air and moisture.
Some gardeners, for better adhesion, put a plastic bag (bag) on top of the graft, but this is not necessary at all, because it is much more important to tightly fix the vaccination site with tape.
- Do not ignore the rules of caring for a grafted tree, otherwise it may reject the cutting.
- Remember that any grafting is a risk of not too strong fusion, especially in the early years, so it is advisable to drive a peg near the tree and tie it to it.
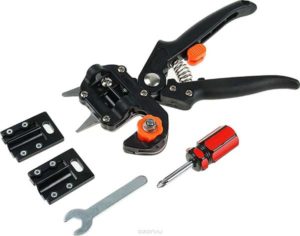
Vaccination tools
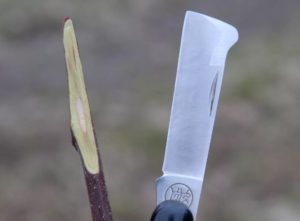
- grafting knife (also called budding knife);
- or grafting secateurs;
Of course, you can use the usual pocket or office knife, but it must be sharpened very well.
- polyethylene tape or electrical tape;
Ideally, this is a special film, which itself is destroyed by ultraviolet rays (i.e. it does not have to be removed).
- garden var.
Answers to popular questions
Several answers to popular vaccine questions.
In the future, the paragraph will be supplemented.
Is it possible immediately (on the day of vaccination) to cut the cuttings and graft in the spring?
It is undesirable, since in spring, in warm weather, the stalk will quickly grow, not having time to take root. The kidneys will pull out all the juices from him, because of which he may die. In other words, if the buds begin to bloom before the graft takes root, then the stalk may simply dry out, since the buds will take all the nutrition from it.
Alternative opinion! However, many gardeners successfully plant cuttings that are cut right on the day of grafting. Of course, subject to access to the donor tree.
The main thing is that the kidneys do not wake up yet.
Moreover, the survival rate of such grafts can be much higher than from cuttings that have passed through storage (due to improper storage conditions, their quality could deteriorate).
When can you cut the cuttings right away?
Always with summer vaccination, namely budding (eye vaccination).
Why is it best to harvest cuttings in the fall?
The fact is that the cuttings that you prepared in the fall and stored in the cold will definitely be in a dormant state during vaccination. Thus, tissue fusion will occur before the kidneys begin to wake up.
In addition, in a harsh winter, there is a possibility of freezing of the donor's kidneys, which will worsen the result of the vaccination. In addition, in winter, and especially in early spring, nutrients are consumed, which also affects the result.
Plum grafting methods
Plum, like other fruit trees, can be planted in different ways. The gardener makes the optimal choice based on his personal experience and preferences.
Advice! First, choose the easiest one for yourself (in your opinion), and then be sure to practice making cuts, fixing the vaccination site. In short, fill your hand.
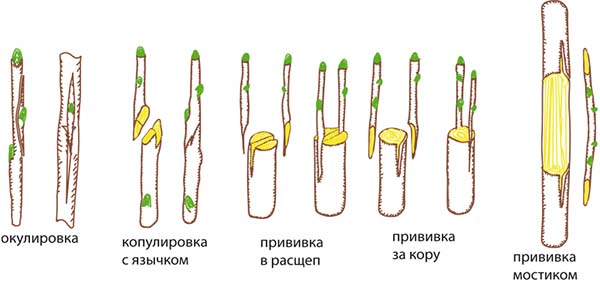
By the way! The vaccination process in any way consists of 3 main stages:
- preparation of stock and scion;
- their combination;
- protection of the vaccination site (wrapping with tape and covering with garden pitch).
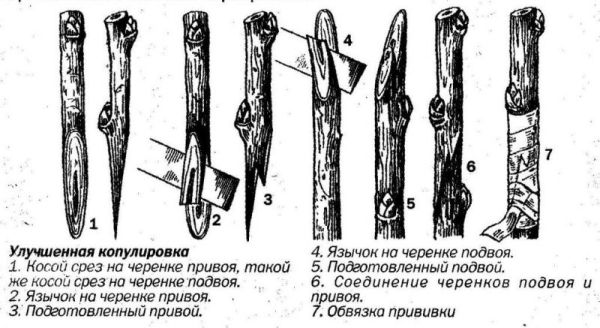
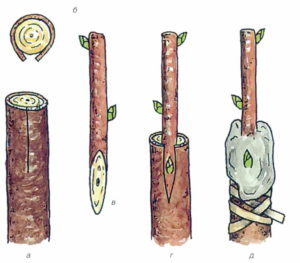
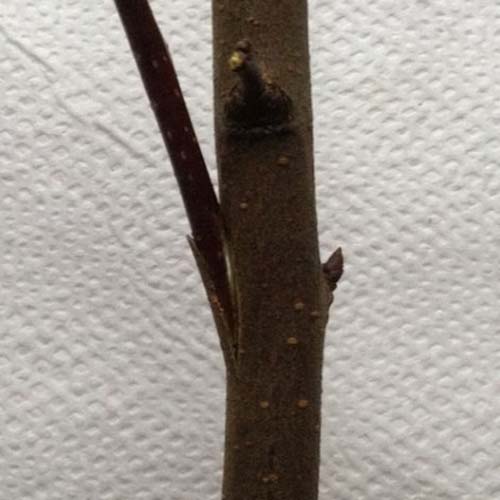
Copulation
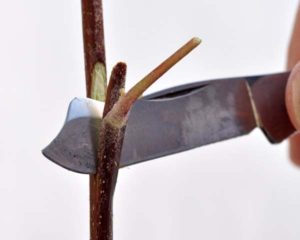
Plum grafting by copulation is carried out in early spring, when the tree is at rest, i.e. before the start of sap flow.
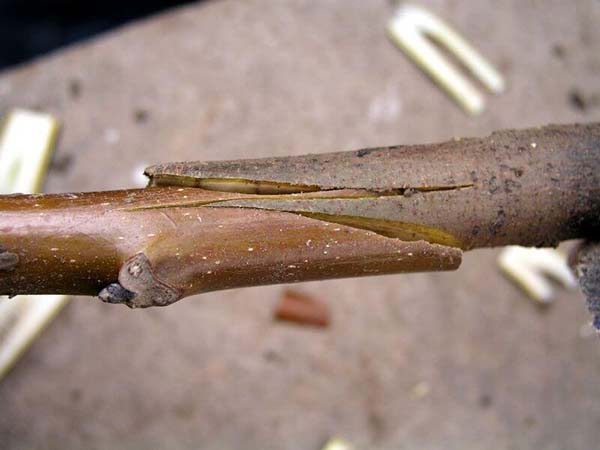
The diameter of the scion, as well as the rootstock, must be the same. Or the stock may be slightly thicker than the scion (cutting), but in this case you need to be sure to combine their cambial layers.
There are two types of copulation: simple (a) and improved (b).
Naturally, the second method is more popular, since thanks to a more reliable contact, the vaccine takes root better than with simple copulation.
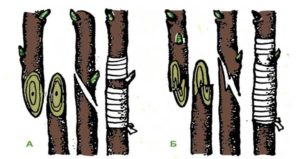
Simple copulation
Stages of simple copulation of plums in spring:
- Make an oblique cut (at an acute angle to yourself) on the rootstock and an identical cut on the scion (cutting) under the lower bud in the same direction.
The cut on the rootstock and the scion should be made of the same length, at the same angle and preferably in one motion (but it's okay if 2-3 times).
- Attach the scion to the stock so that their cambial layers coincide.
- Wrap the vaccination site tightly with foil or electrical tape.
- Cut off the top of the cutting (scion), leaving 2-3 buds (above the upper bud) and cover the cut with garden var.
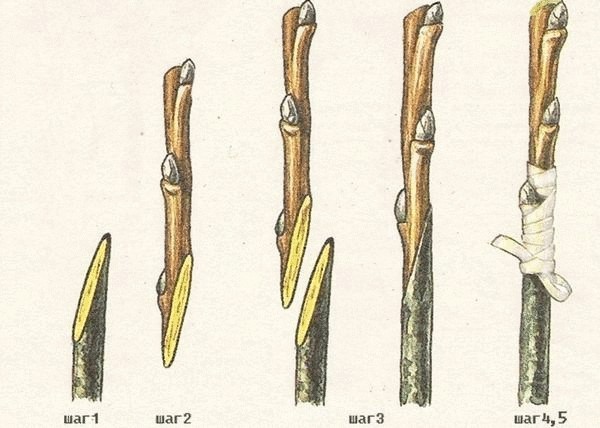
Improved copulation
Spring grafting of plums using the improved copulation method:
- Similar to simple copulation, oblique cuts must be made on the rootstock and scion.
- After that, stepping back from the upper edge of the cut by 1/3 of the length, make a "tongue" on the rootstock (cut 10-12 mm deep into the shoot).
- Make exactly the same "tongue" on the scion.
- Insert the scion into the stock, in other words, start the "tongues" behind each other.
- Further, everything is the same: tightly wrap the graft site with foil, remembering to cut the scion over 2 or 3 buds, and process (cover) its upper cut with garden var.
Video: Plum grafting with improved copulation
Thus, the only difference between the two grafting methods is that small splits are cut out on the cuttings (make "tongues" for better grip), the depth of which is equal to 1/3 of the length of the oblique cut.
Video: grafting trees - simple and improved copulation
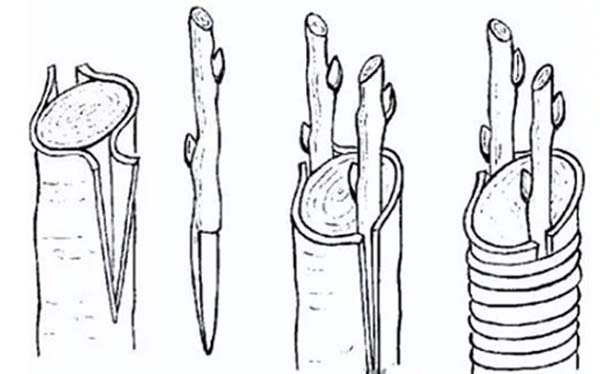
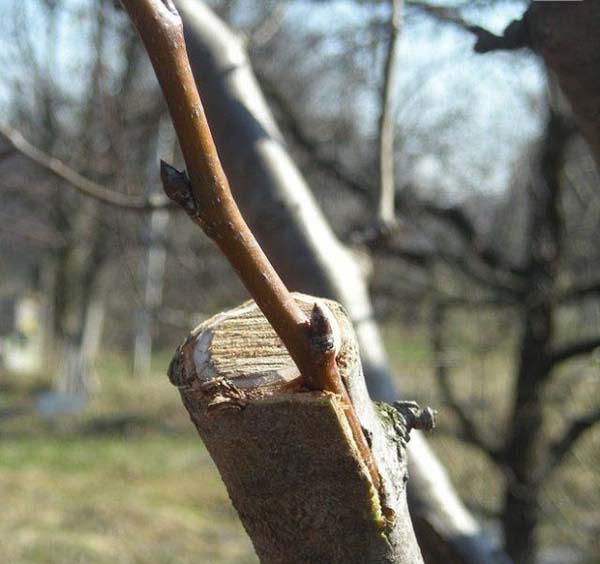
Into the cleft
In the split, as a rule, adult (thick) tree branches are grafted, but it is quite possible to graft young ones with this method.
As for the timing, the grafting of the plum into the split is carried out while sap flow did not start, i.e. when the tree is dormant.
Split grafting is performed when the stock is thicker than the scion (cutting). But in any case, the stock should not be thinner than the scion!
Moreover, if the rootstock branch is thick, then you can use 2 scions (cuttings) at once, placing them opposite each other (on opposite sides).
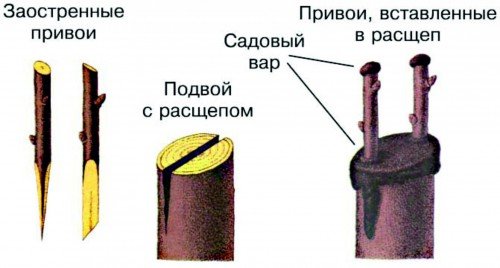
Next, we will clearly consider an easier way, when the stock is thin and only one cutting (scion) is placed in it.
Although in this case, the half-split grafting is sometimes used.
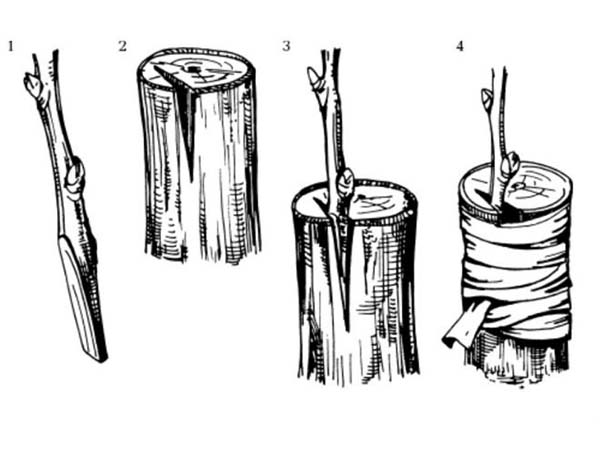
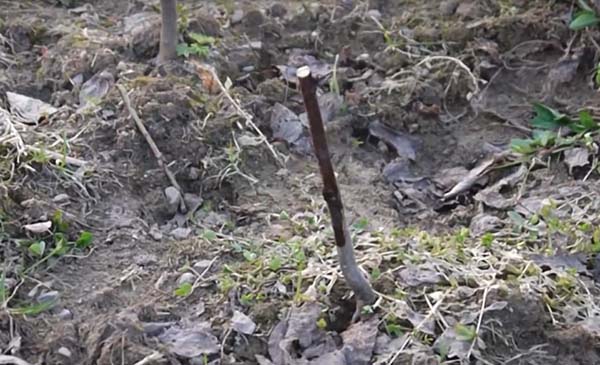
Algorithm for spring grafting of plums into the split:
- Cut off the branch selected as a rootstock at the required height.
- Place the knife in the middle and slightly press down - make a split (2-5 cm deep, depending on the thickness of the scion and rootstock).
It is desirable to insert some kind of wedge into the split, the same screwdriver.
- Prepare the scion (stalk) in order to insert it into the cleft - sharpen on both sides so that it matches the stock and fits easily into it.
- Insert the scion into the stock and move to one of the edges to align the cambial layers.
- Cut off the stalk over the top bud, leaving 2-3 buds.
- Fix the vaccination site with foil or electrical tape (so that the tissues are in contact with each other as closely as possible).
In this case, wrap correctly from bottom to top, although many do it the other way around, i.e. from top to bottom, and everything successfully takes root.
- Cover open grafting sites with garden varnish (including the top of the scion).
When, after 3-5 weeks, leaves begin to hatch from the buds, the fixing tape will need to be promptly removed so that the trunk can freely thicken.
By the way! This method is considered one of the simplest and most effective methods of grafting by cutting. Subject to all the rules, the survival rate of grafts in the cleft is almost 100%.
Video: how to plant a plum in a split
Video: master class on grafting plums into cleft
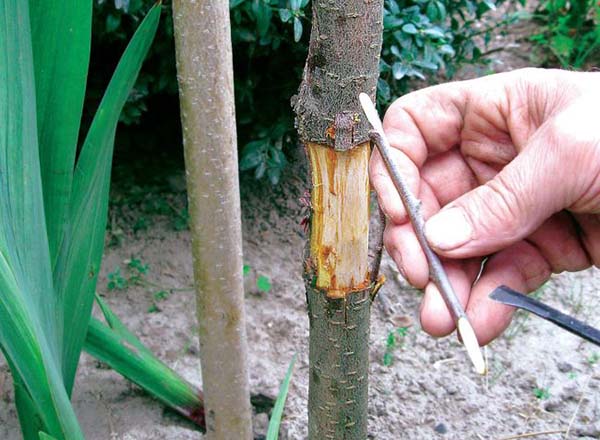
For the bark
Plum grafting for the bark is already being done during sap flowwhen the trees are close to blooming and the leaves have long blossomed. Therefore, in this case, you can use only pre-prepared cuttings (with dormant buds).
This method is used to rejuvenate an old tree, in other words, it is used for grafting onto an adult tree (but preferably not older than 10 years).
To do this, the main tree trunk is cut down (for example, to re-graft) at a height of 70-100 cm or its skeletal branch (at a distance of 20-40 cm from the central trunk), and several cuttings are inserted simultaneously behind the bark, but so that they do not touch each other with a friend.
Thus, the rootstock should be 2-3 times larger in diameter than the scion.
Algorithm for grafting plum bark in spring:
- Cut the central trunk or skeletal branch.
- Then make cuts in the bark 3-4 cm long. The wider the trunk, the more cuttings can be implanted into it.
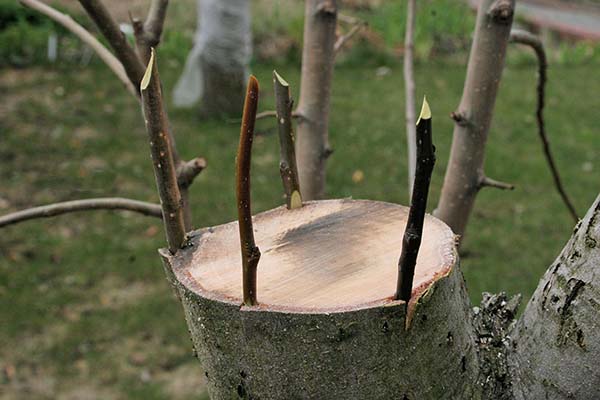
Alternatively, you can make holes between the bark and the wood - drive in pegs (the size of the scion) to move the bark away from the wood.
- Now you need to prepare the cuttings (grafts). Make oblique cuts at the bottom and leave 2-3 buds.
- Insert the grafts into the bark of the rootstock.
- Fix the cuttings tightly with tape and cover the open grafting sites and the upper cut of the cuttings with garden pitch.
If the diameter of the trunk is not very wide, then it is quite possible to graft one stalk behind the bark.
Video: grafting fruit trees for the bark
Note! Grafting for the bark, although it has a high survival rate, but it has one, but a very significant drawback: under the grafted branches, when they are under harvest (and just to protect against strong wind), it is imperative to put props, otherwise the weight of their fruits will break off.
In splitting or improved copulation, grafting is much more reliable.
Side cut
The optimal time for grafting plums into a side cut is the second half of spring, when vegetation (sap flow) has already begun.
As with any spring grafting, as a scion, you need to use a strictly dormant cutting, harvested in autumn or early spring, when the tree was still sleeping.
This method of grafting is used when it is necessary to rejuvenate an adult tree or for the purpose of domesticating wild rootstocks (wild animals).
The essence of the lateral incision grafting method is that the graft is grafted on the side of the rootstock by inserting it into a small incision.
The main advantage of this method is that the scion grows very tightly and reliably with the stock.
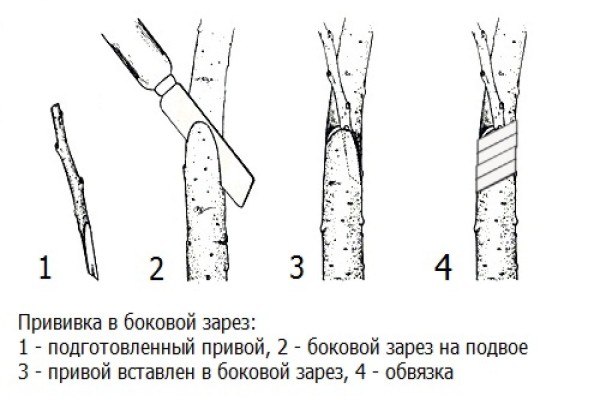
The sequence of carrying out spring grafting of plums in the side cut:
- Make a side cut on the rootstock. At the same time, he must look in the direction we need.
To do this, position the knife at an angle of 15-30 degrees to the trunk so as to cut not only the bark, but also some of the wood.
- Prepare the scion: make a wedge at the bottom of the cutting by making an oblique double-sided cut. And on top, as usual, leave 2-3 buds.
Please note that the depth of the cut on the rootstock must match the length of the cut on the rootstock.
- Insert the handle into the cut.
In this case, it is optimal to combine the cambial layers of the scion and rootstock from all sides or at least one.
- Secure (wrap) the graft site tightly with tape.
- Cover the top of the cutting (scion) with garden varnish.
Video: grafting into the lateral incision of the skeletal branch
Video: grafting into the side of a young seedling
By the way! Side slit grafting, along with cleft grafting and improved copulation, are considered to be the main grafting methods most commonly used in hobby gardening.
Budding (inoculation with an eye): butt and T-shaped
Inoculation by budding is usually done at the end of summer - in the last days of July-early August, when the buds on the growths of this year are already ripe, and the growth of shoots will practically stop.
If you do this ahead of time, then the buds may germinate in the fall, which means they most likely will not survive the winter. On the contrary, if you are late, then the eyes simply will not have time to take root in the stock, since there will not be enough juice in its cambial layers.
However, you can also spring budding plum, you just need to wait the beginning of sap flow.
This method is used for grafting both very young 1-2-3-year-old seedlings - wild birds (i.e. directly into the central conductor), and for grafting skeletal branches (1-3 years old) of already mature trees.
The essence of grafting plums with an eye is that they are grafted onto the stock not a whole stalk, but only a bud (eye) of a scion... In other words, budding is the transfer of a bud from one tree to another (its kind of implantation).
Plum grafting with a kidney, due to its simplicity, can be done even by a novice summer resident without any problems.

The sequence of summer plum grafting by budding method:
In the evening, spill the seedling well, and foresee the budding itself in the morning, as you cut the cuttings (at this time they are saturated with moisture as much as possible).
- Remove all the lower branches and wipe the rootstock trunk from dirt and dust (the place where you will graft). In this case, it is better to choose the northern side of the branch to avoid direct sunlight.
Budding of young seedlings, as a rule, is carried out at a height of 3 to 25 cm from the surface of the earth, it is possible almost above the root collar itself. The lower the graft, the better the accretion, the closer the roots, and the more powerful the seedling will grow.
- Cut the bark into the rootstock at the site of the future grafting with the letter "T" (T-shaped cut).
Such budding is called T-shaped.
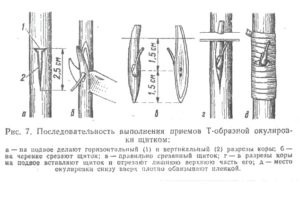
Or you can do it a little differently: make a bottom notch at a 45-degree angle inward, and then an upper notch down to the bottom notch. Throw away the cut out part of the bark, and before that it can be left “for fitting” (this is the shape we will need the graft).
Such budding is called butt.
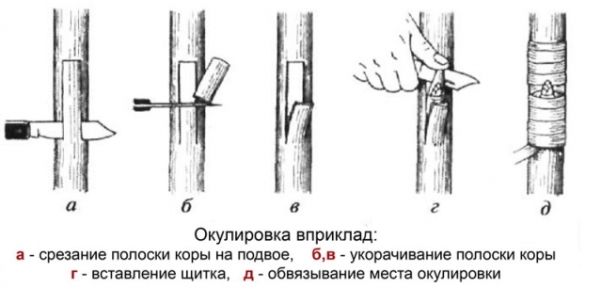
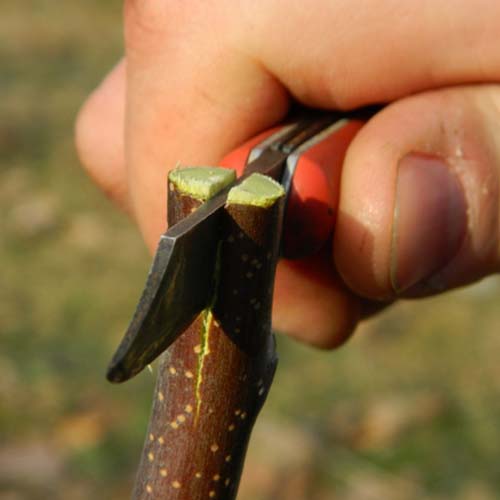
- Next, you need to cut off the kidney (eye) with a shield. However, first you need to cut the stalk itself and remove all the leaves from it, but leave their petioles;
We make one short cut under and above the kidney, and then we turn the knife over and start cutting from the bottom up, cutting off the kidney with a shield. After cutting, the top of the shield is between the knife and the thumb.
- Now you need to drive the resulting bud with a shield under the bark (put in a pocket) of the rootstock.
Ideally, the flap should perfectly match the rootstock cut. If it turns out to be a little longer, then after you place it in the pocket on the rootstock, the top can be trimmed.
If the scion is thinner than the rootstock, then it is better to apply the shield to one of the edges of the cut on the rootstock in order to combine the cambial layers.
- Next, you need to tightly wrap the grafting site with tape from above, while leaving the eye open.

Video: budding plum on cherry plum
Advice! For the winter, it is better to cover the grafting site with earth or cover it with snow, and first remove the tape (3-4 weeks after budding, when the kidney takes root).
- And in the spring you will need to get rid of it andprune an old tree right above your grafted bud.
- Next, you need to monitor the growth of the shoot from the bud and tie it up in time so that the trunk (stem) is not crooked.
The advantages of grafting plums by budding method include high survival rate and low costs of grafting material.
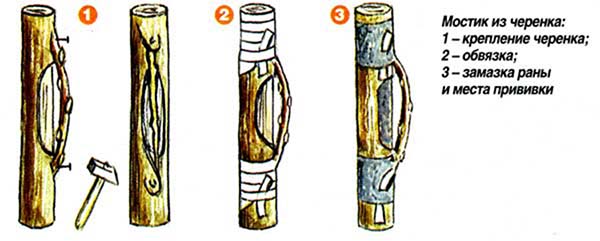
By the bridge
This vaccination method is used to save plums damaged (gnawed) in winter by hares or mice.
Note! Bridge inoculation is performed only when ring damage, in other cases (if there is even a small isthmus of the bark) you just need to cover the bare trunk with garden pitch.
The essence of the grafting is to restore the nutrition of the tree (its sap flow), for which a special bridge of cuttings is used (and not necessarily varietal, wilds are also suitable).
The optimal timing for the "saving" grafting of plums with a bridge is after the start of active sap flow.
Advice! If you notice damage even before sap flow, then it (the place of damage) should be covered with garden pitch.
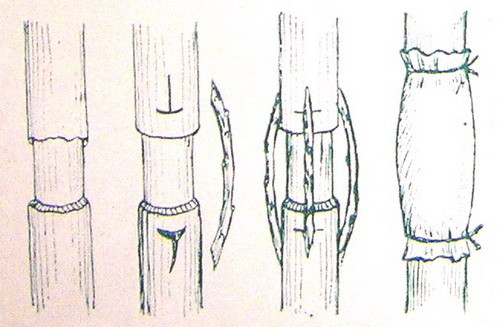
The procedure for grafting plums with a bridge in spring:
At least 2 bridges are made on the tree. Since 1 bridge may not take root, it is better to play it safe.
- Clean the place of damage from the garden varnish, clean the bark to a healthy place, wipe it, and then make T-shaped cuts in the bark below and above (or you can just make cuts under the bark) 3-4 cm long;
- Next, prepare the cuttings: you need to remove all the buds from them, and then make long and oblique cuts at both ends (at least 3, and preferably 4 cm).
- Now you need to slightly bend the bark and insert the cuttings into the cuts;
The bridge should have an "arcuate" shape.
- All that remains is to fix the grafting with tape and cover the open areas with garden varnish.
Some gardeners even nail the stalk from the bottom and top with nails.
Video: grafting with a bridge a tree gnawed by mice
Plum care after vaccination
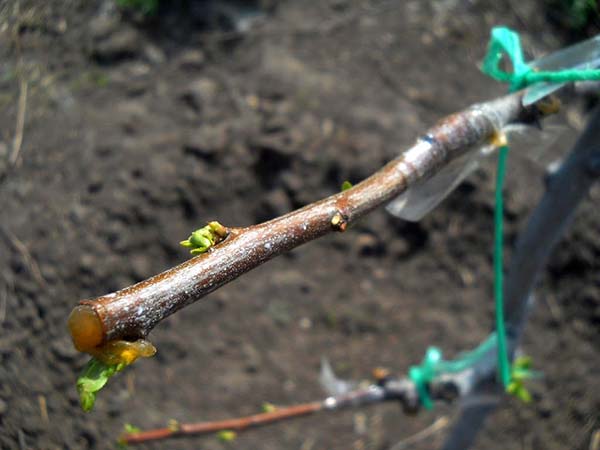
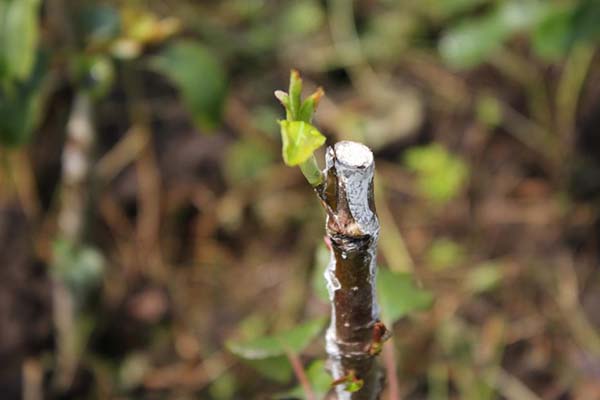
It will be possible to understand that the vaccination was successful after 3-5 weeks, when the buds begin to open and the first small green leaves appear.
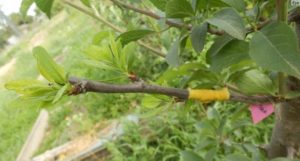
And first, you should periodically inspect the vaccination site, because the cut can dry out due to a violation of the tightness of the strapping and putty, which in turn can occur due to fluctuations in spring temperatures.
When the graft has grown together and the stalk begins to grow, you need to provide the plum tree with the necessary care that will help the grafting take root better.
- If possible, shade the vaccination site, protecting it from direct sunlight.
Alternatively, you can get the vaccine directly from the north side.
- A couple of weeks after the kidneys have fully opened and the leaves appear, loosen or completely remove the harness (electrical tape) so that the trunk can thicken unhindered.
- It is very important to promptly cut off young growth below the grafting site so that the tree directs nutrients to the taking root.
- If the scion suddenly blooms, then the flowers must be removed.
However, this, in principle, cannot happen, because the cuttings should have exclusively vegetative buds, not fruit buds.
- After 1-2 years, the grafted stalk will need to be shaped.
Video: how to plant a plum - mistakes and tips
Thus, despite the fact that plum grafting is a rather complicated surgical garden procedure, even a novice summer resident will be able to master it over time. You just need to train more often. Naturally, observing the basic rules and following the instructions above.
Important! Beginners shouldn't get discouraged if things don't work out well the first time. When you fill your hand, the vaccination will no longer seem like something difficult.
Video: the main ways of grafting fruit trees and their results
Great article. So much useful material can be learned from here for novice gardeners. And experienced ones - to master the nuances.