

Planting calla tubers in open ground in spring: terms and rules for growing
So you could not resist the wonderful calla lilies and decided to plant them on your site (in open ground or a pot to put on the veranda).
Next, you will learn what calla lilies are, their varieties (white and colored), what are the features of their cultivation and, naturally, when and how to plant their tubers or rhizomes correctly so that they bloom beautifully and abundantly.
However! In more detail, we will focus on the cultivation of tuberous calla lilies.
Content
- 1 Varieties and varieties of calla lilies: white and colored (rhizome and tuberous)
- 2 When to plant calla lilies in open ground and for germination in a pot
- 3 Is it possible to grow calla lilies in an apartment
- 4 How to choose and prepare calla tubers for planting
- 5 Planting calla tubers in a pot for germination at home
- 6 Planting calla tubers in open ground
- 7 Rules for caring for tuberous calla lilies in the open field
- 8 Digging and storing tubers in winter
Varieties and varieties of calla lilies: white and colored (rhizome and tuberous)
Callas are of two types - rhizome and tuberous.
Rhizome calla lilies are Ethiopian calla lilies, they have flowers are white.

Tuberous calla lilies, in turn, are of 2 types:
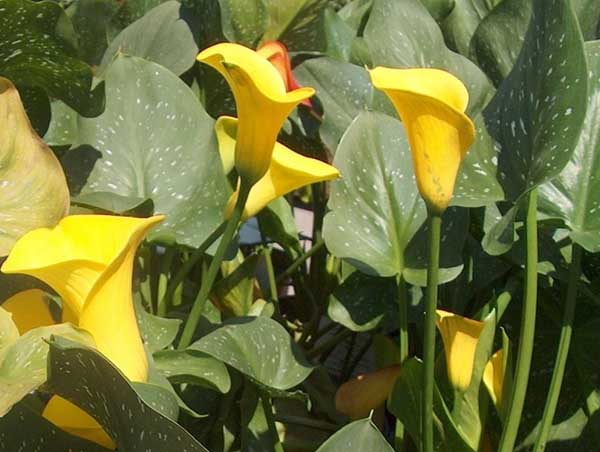
- Calla lilies Elliott (yellow).
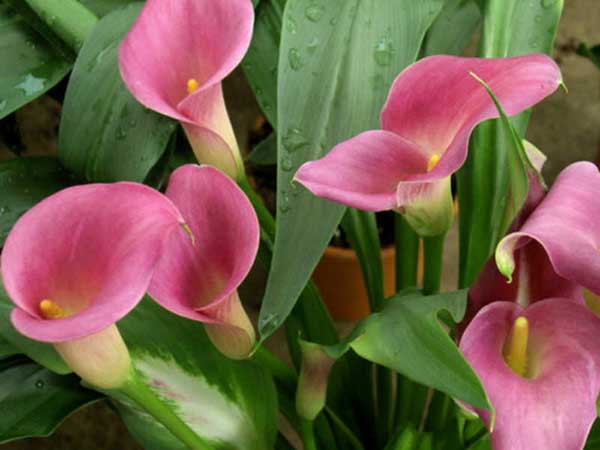
- Calla lilies Remani (pink).
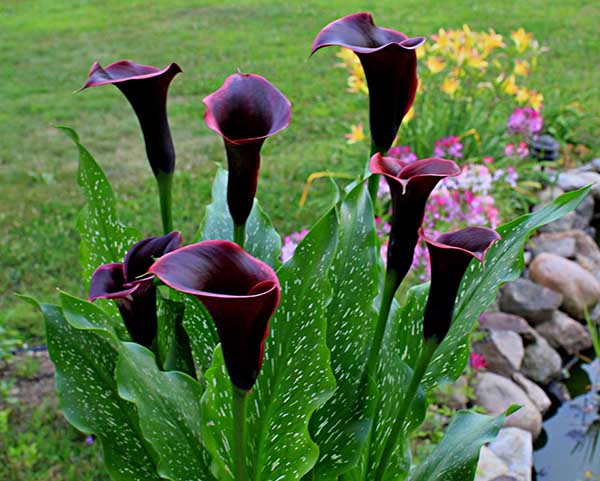
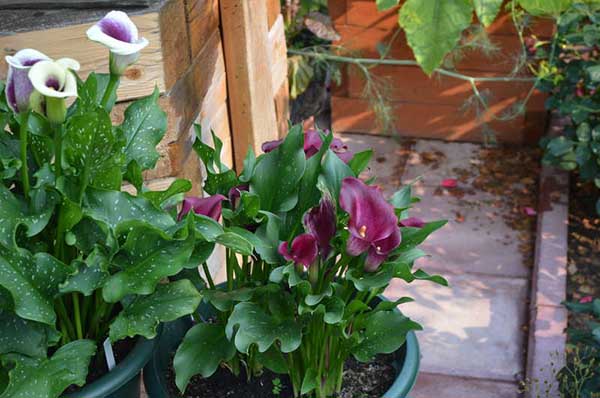
Moreover, on sale most often you can find multicolored hybrids (pink, crimson, yellow, maroon) based on these two species.
Features of planting and growing rhizome white calla lilies
If tuberous calla lilies (colored) bloom in summer, and their dormant period is in winter, then rhizome Ethiopian white calla lilies bloom in winter-early spring (November to March), and their rest period is usually in summer.
Although it would be more accurate to say that they do not have a pronounced rest period, because leaves do not die off completely.
Thus, if you want the white Ethiopian calla to bloom profusely, then you need to fulfill a number of conditions: provide a dormant period in the summer (minimal watering), digging in the fall, good lighting and high humidity in the winter during the flowering period.
Important! Rhizome calla lilies, like tuberous ones, need to be dug up for the winter, transplanted into a pot and brought home, because they bloom in winter (from late autumn to early spring).
As for the differences in cultivation techniques, the white rhizome calla lilies are stronger love moisture, preferring wetlands, whereas tuberous in such conditions will not be able to develop normally (will start to rot).
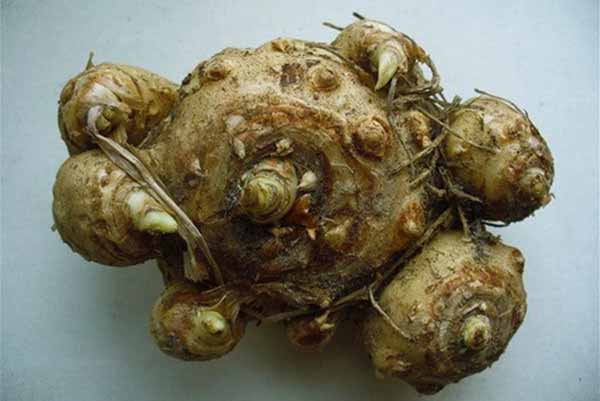
The rhizomes of white Ethiopian calla lilies look like this:
Video: growing calla lilies - care secrets in the garden and at home (most of the video is dedicated specifically to the Ethiopian white calla lilies)
When to plant calla lilies in open ground and for germination in a pot
You can only plant calla tubers in open ground after frost, and when the ground will warm up to a landing depth of up to 10-12 degrees.
In other words, in the Middle Lane (Moscow region) - not earlier than the second half of May, and in the North-West (in the Leningrad region), in the Urals and in Siberia - not earlier than the end of May-beginning of June.
If you are going to sprout tubers at home in a pot, then planting should not be done earlier than the second half of March-early April (i.e. approximately 1.5-2 months before planting in the ground), because they grow fast enough.
Important! If planted earlier, due to a lack of light, the plant will stretch and, as a result, bloom worse (weakly) in summer.
According to the lunar calendar for 2021
If you want to choose a specific day, you can use the Lunar calendar.
So, auspicious days in 2021, according to the lunar calendar, for planting calla tubers in open ground:
- in March - 8-12, 26-31;
- in April - 7, 9-15, 17-22, 27-30;
- in May - 2-6, 9-12, 20, 21, 29-31;
- in June - 7-9, 11-14.
By the way! Planting tubers in a pot (at home for germination) is also recommended in accordance with the lunar calendar.
Unfavorable dates in 2021 (days of the Full Moon and New moons, as well as the period when the Moon is in Aquarius, because it is a barren and dry sign -italicized):
- in March - 9-10, 13, 28;
- in April - 5-6, 12, 27;
- in May - 2-4, 11, 26, 30-31;
- in June - 10, 24, 26-27.
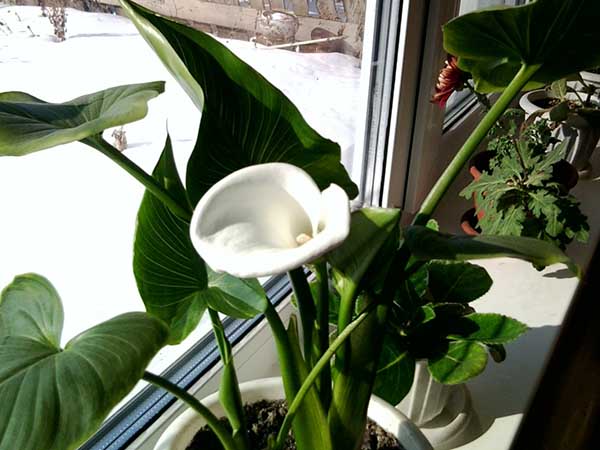
Is it possible to grow calla lilies in an apartment
Callas can grow at home, but exactly white calla lilies (Ethiopian, which have rhizomes, not tubers)since they are less demanding on lighting. However, for normal development, they need high humidity. If it is dry, then they will bloom poorly or not at all.
By the way! White calla bloom in winter or closer to spring (November to March).
In this case, you need a wide pot with a volume of at least 3, and preferably 5 liters, with a diameter of at least 25-30 cm, and a depth of 10-15 cm.
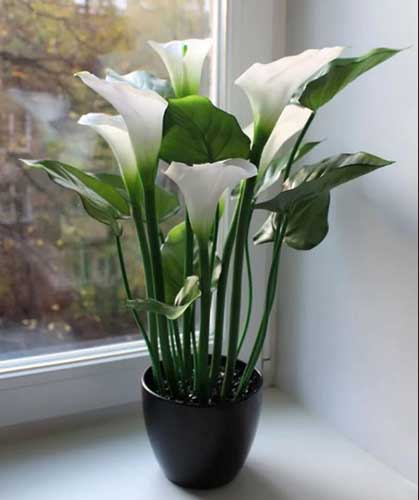
And here Colored calla lilies are exclusively garden flowers... In room conditions, they will lack light, and they will begin to stretch out strongly.
Another thing is that Colored tuberous calla lilies are best grown in flowerpots, displaying in the garden, for example, on the veranda.
Actually, you can do the same with whites.
How to choose and prepare calla tubers for planting
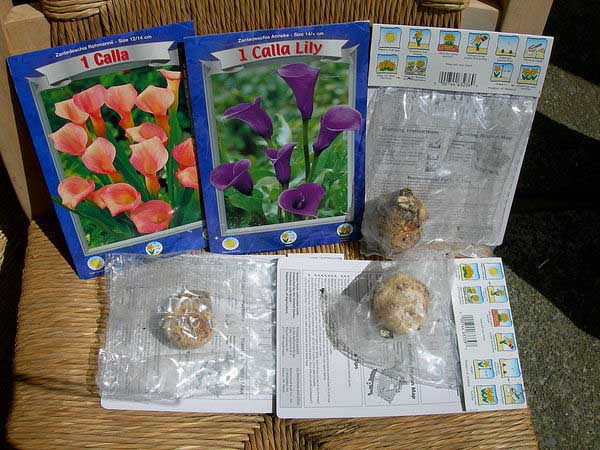
What to look for when buying calla tubers:
- Condition of tubers. They should be healthy - light, firm.
If the tuber is dry, lethargic, dark, with mold spots on it, then you do not need such planting material.
- The size. If you want calla lilies to bloom in the first year, then choose large enough tubers (4-5 cm in diameter), small (children) will not bloom (up to 3 cm in diameter).
Cooking tubers for planting
First of all, you need to inspect the tubers for various damage and dry rot. They need to be cut to healthy tissue, and then treated with brilliant green or crushed coal and allowed to dry.
Etching
Step-by-step instructions for pickling calla tubers (suitable for any tuberous plant):
- Purchase a disinfectant (fungicide) and prepare a solution according to the instructions.
Popular tuber disinfectants: Maxim Dachnik, Augustine (for etching planting material), Vitaros, Fundazol, Fitosporin... Or you can even use copper sulfate (1% solution = 5 g per 500 ml of water).
- Put the tubers in the dressing solution.
Advice! At the same time, it is highly recommended that the tubers are not completely in the water, but somewhere 3/4. The upper part where the kidneys are located should not be in water.
- The time for dressing tubers in solution, depending on the drug, is 20-40 minutes (read the instructions on the package).
By the way! If the tubers are in a dormant state, then for them for better germination, you can additionally soak them in one of the growth stimulants, for example, in Epin or Zircon.
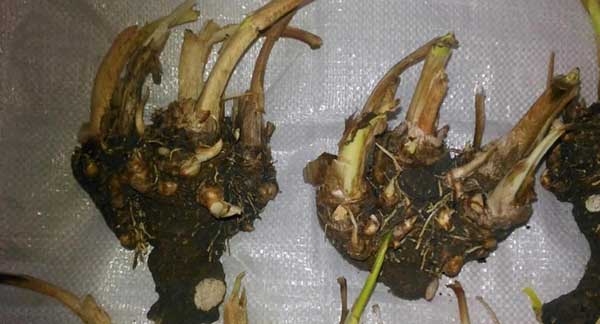
How to determine where the tuber is "up" and where is "down"
Why is it so important to plant the tuber correctly?
It is obvious that if you plant the tuber upside down, then the sprouts simply will not be able to germinate and, most likely, will rot under the ground.
It's actually pretty simple. Buds buds (3-5 mm tubercles) are clearly visible - this is the top of the tuber. And the bottom, as a rule, is absolutely smooth, without any bulges (the roots will appear not at the bottom, but at the top, where the buds are).

Another option. Moisten the tuber with Epin's solution, then wrap it in a paper napkin soaked in Epin's solution, and put it in a dark place for a couple of days. After the lapse of time, the tuber will not only have the rudiments of the roots, but also the sprout will wake up.
Planting calla tubers in a pot for germination at home
In general, you can buy calla tubers in May and immediately plant them in the ground. But if you want the plant to bloom faster, then you can germinate it at home in a pot.
We remind you! You need to get tubers out of the refrigerator for germination not earlier than the second half of March-April, about one and a half to two months before planting in the ground.
The first step is to choose suitable pot.
- As for its size, it should be relatively roomy (2-3 liters), at least 15 cm in diameter, i.e. broad, but not necessarily very deep (10-15 cm).
In a plant, all the roots are on the surface (grow up) and do not go deep into the ground.
- At the bottom of the pot must be drain holes (In no case should moisture stagnation be allowed!). Additionally, it is advisable to even pour drainage layer from expanded clay.
Next fill the pot light nutritious soil, in other words, it should be loose (air and moisture permeable), preferably slightly acidic or close to neutral acidity (5.2-6 pH).
Alternatively, you can use a special soil substrate for begonias or saintpaulias.
Or cook it yourself from turf, peat, compost and sand.
Like the tubers themselves, potting soil is also desirable disinfect, for example, by pre-steaming in the oven and / or spilling with a solution Fitosporin.
Next, you need to properly plant the calla tubers in the pot:
- Fill the pot with potting soil, but not completely (about 3/4 full).
- Concerning planting depth, then you need to understand that the roots of the tuberous calla grow upwards, in other words, you need to either initially deepen it by 5-7 cm, or plant it without deepening (Fill up a little, but so that the buds are in the light!) and pour the earth over as the roots grow.
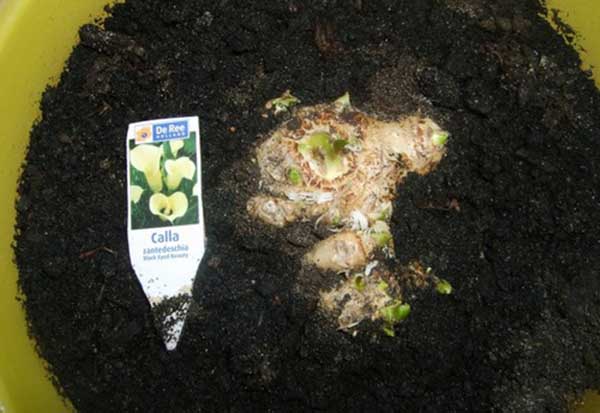
- Watering (you can use a solution Fitosporin).
- Place on a light (southern, southwestern or southeastern) and warm windowsill.
- Further care of calla lilies before planting in the ground is reduced to watering as the top layer of the soil dries up and maintaining suitable conditions (warm, light, relatively humid).
Planting calla tubers in open ground
Choosing a place in the garden
If you want tuberous calla lilies to bloom well, then you need to find in the garden well lit warm placebut desirable with shading at lunchtime (from scorching direct sunlight).
Or you can plant in light partial shade, where the light will be diffused, and the sun will only break through the openwork crown of the tree.

You cannot plant in a deep shadow! If there is not enough light, the leaves will stretch out, the flowers will be small, and their color is pale (greenish).
In general, calla lilies love moisture, so they can be planted next to artificial reservoirs.
As for the preparation of the flower bed itself and the soil, the soil should be loose (light, moisture and air permeable) and fertile. Therefore, peat, humus and sand should be added for digging or loosening.
If desired, you can immediately apply a complex mineral fertilizer (the same nitroammophoska).
Direct planting of tubers
Planting calla lilies in a pot
Before planting calla lilies in open ground, it is advisable to harden them (7-10 days before planting) - the adaptation of the plant to more severe outdoor conditions. Namely, gradually start to take out on an open balcony or in the garden during the day.
We pass to disembarkation.
Make the hole one and a half times larger than the size of the pot, carefully take out the plant along with the earthen clod (trying to keep it as much as possible) and plant it with a slight deepening. After that, sprinkle with fertile soil, compact. Then water and mulch.
Or you can transfer the calla lilies together with a lump of earth into a larger pot to put on the street in the garden.
Planting tubers without germination
- Make the holes the required distance.
- Do not forget that you need to plant tubers with tuber sprouts up, and with a smooth bottom down.
- Because the surface layer of the soil dries up quickly enough, it is necessary to plant the tubers with some depth, but no more than 5-8 cm.
Please note! When deeply deepened, the calla will bloom poorly, because the tuber should warm up well, and much cooler at depth.
- Water and mulch.
Rules for caring for tuberous calla lilies in the open field
Taking care of calla lilies, like other flowers, is quite simple, all procedures (agrotechnical care measures) are quite standard.
To water calla lilies need in moderation, in no case flooding, but also not allowing the earthen to dry out. Therefore, watering should be frequent, but not plentiful (relatively shallow).
Concerning top dressing, then the first feeding can be done 10-14 days after transplanting, and then carried out every 2-3 weeks. Like all flowering plants, calla lilies respond well to potash fertilizers (potassium sulfate, wood ash), also do not forget about phosphoric (superphosphate). Or you can use complex fertilizers for flowering plants, the same Fertik.
Be careful with nitrogen fertilizers, from their excess, the plant can begin to fatten and drive only leaves to the detriment of flowering.
- As it blooms, it is necessary gently remove wilted pedunclesso that new ones are formed in their place.
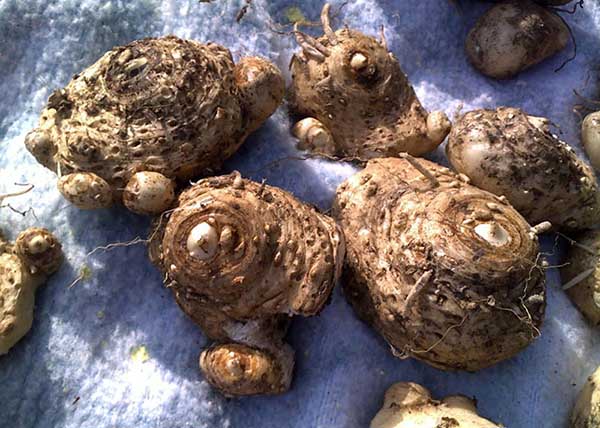
Reproduction by children
In the process of growth and aging, babies will form around the tuber, which you will need to separate from the maternal tuber only in the second year after emergence (i.e. one year to store, plant, and then separate and store separately).
What to do if the flowers started to "turn green"
Calla inflorescences can turn green for the following reasons:
- The light does not dawn. - It is necessary to transplant to a more illuminated place.
- Lack of nutrition (potassium). - Feed with potash fertilizer or complex fertilizer for flowering plants (with a minimum amount of nitrogen).
- Excess nitrogen fertilizers.
By the way! Sometimes calla lilies turn green at the end of flowering. In this case, you need to cut off the old peduncle to wait for the new one to appear.
Why didn't they bloom at all
One of the main reasons why calla lilies do not bloom is keeping tubers warm in winter.
The fact is that calla tubers need a dormant period that should take place in cool conditions!
Therefore, you need to ensure the rest period correctly. So don't be lazy store tubers in a cool place - cellar, basement or refrigerator.
A common reason for the lack of flowering is excessive deepening of tubers when planting, which is why they simply do not warm up.
Of course, if tubers in the ground will rot (for example, due to too frequent watering or excessive waterlogging of the planting site), then they will not bloom.
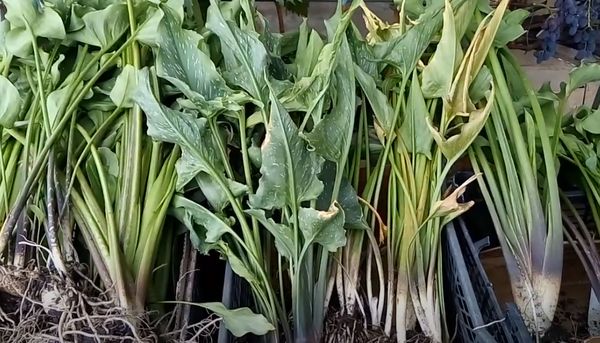
Digging and storing tubers in winter
Advice! About, when to dig up tubers and how to store calla lilies in winter read in detail in this separate article.
Well, now you know everything about growing calla lilies in the open field and at home in a pot, and not only tuberous (colored), but also rhizome (white). Good luck!
Video: how to grow calla lilies