

Preparing gladiolus bulbs for planting in spring: a step-by-step guide
So, you are just about to or have already purchased gladioli bulbs in a garden store and are planning to plant them for the first time this year. Or you already have experience in growing them (last year they dug up and removed them for winter storage), and you are interested in the procedure for preparing the bulbs for their spring planting in the ground.
Well, then you will learn about all the preparatory activities that must and preferably be carried out with the bulbs, so that gladioli quickly take root after planting, go into growth and delight you with abundant flowering.
Content
Preparing gladioli bulbs for planting: step by step instructions
In general, you need to remove scales from the bulbs, then put them in a cool and bright place (to stimulate germination of the sprout), and pick them in a solution of fungicide and / or insecticide just before planting in open ground.
When to remove bulbs from storage
As a rule, gladiolus bulbs are pulled out of storage no earlier than a month (preferably even 2-4 weeks) before the expected date of disembarkation in open ground.
Accordingly, the approximate time frame is second half of April-early May.
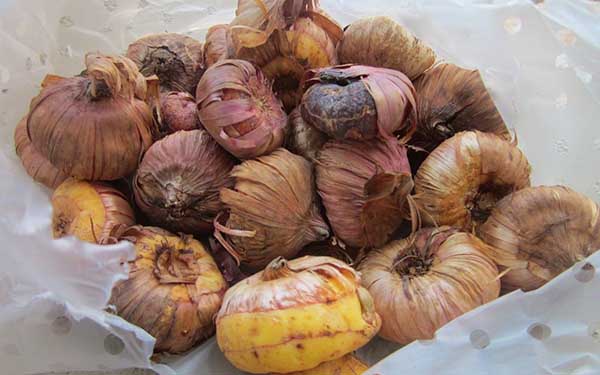
Cleaning and inspection
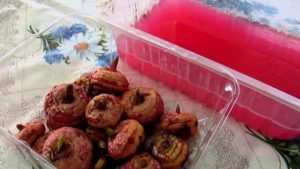
The bulbs were taken out, now they must be carefully cleaned of the upper dry scales (without damaging the sprout) and the remnants of the bottom, while assessing their condition in parallel. Healthy bulbs should be:
- clean and smooth, free from damage and free from any signs of disease or pests;
If the bulbs look like overdried, then, most likely, the main pest of gladioli, thrips, has wound up on them. It is better to discard such bulbs (do not buy).
The presence of thrips can also be detected by touch. The bulb is rough and rough, as if "mealy" (covered with sand).
- have buds that have started to grow (hatched) (usually 1 or 2);
- have on the bottom slightly outlined root tubercles and roots that have begun to grow slightly.
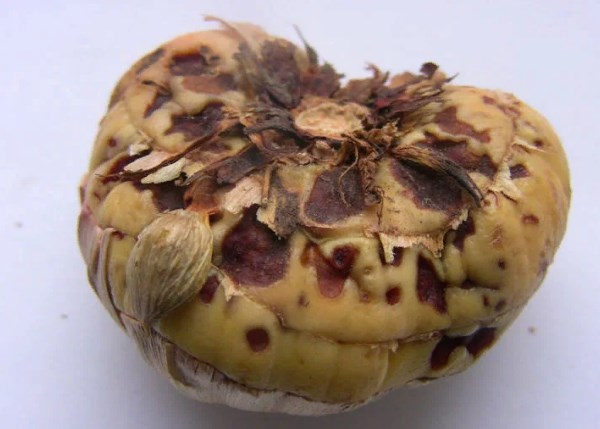
Note! If you notice small spots on the surface of the bulbs, then most likely this is some kind of disease (scab).
However, this does not mean that the bulbs will have to be thrown away.
It is recommended to carefully cut the affected areas (with a sharp scalpel or nail scissors) to a healthy tissue, and then thoroughly lubricate with brilliant green or sprinkle with crushed charcoal (wood or activated) to disinfect the damaged areas.
Of course, it is advisable to plant such bulbs separately due to the fact that they can infect healthy specimens.
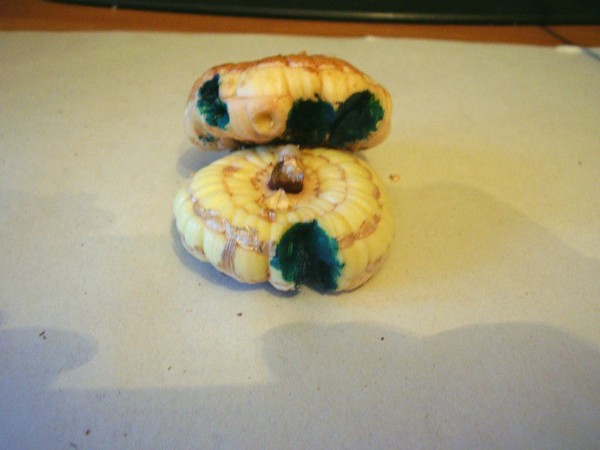
If the bulbs are affected by fusarium (sunken brown spots), then you will have to get rid of them. it will hardly be possible to cure them.
Vernalization procedure
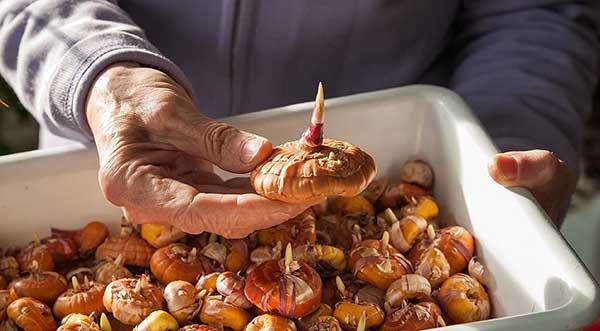
To carry out this procedure, the peeled bulbs are spread with sprouts (buds) upwards in a bright place (preferably cool, where the temperature is + 16-18 degrees), but without access to direct sunlight.
Important! Never place the bulbs on a wet rag (cloth) or even more damp sawdust! This will definitely cause root germination, which we don't need at all.
Such sun treatment will stimulate the activation of growth processes in the bulb, in other words, this way the growth bud will wake up faster (of course, if it has not yet woken up), as a result, the bulbs will take root and bloom faster.

By the way! Bulbs in the light, like potato tubers, turn green. This is totally normal. Such green bulbs will better resist all kinds of fungal diseases and pests.
When, after 2-4 weeks, the green shoot begins to grow on the bulbs, they can be planted in the ground.
Soaking (dressing) the bulbs in fungicides, insecticides and growth promoters
If you found damage on your bulbs, cut them out, and then treated with brilliant green or coal, then immediately before disembarkation (even on the day of disembarkation) they must be etched in a solution of one of the fungicides (remedies for diseases). In other words, you need to soak the planting material for about 20-30 minutes in Maxim, Fundazole or Vitaros (according to the instructions).
Of course, potassium permanganate can also be used, but this is a rather weak and ineffective dressing agent, it is better in a solution of copper sulfate (1%).
As you know, the most malicious pest of gladioli is thrips, therefore, it is also advisable to additionally soak the bulbs (especially purchased ones) in a solution of one of the insecticides (anti-pest drug), for example, Iskra, Dephis Profi, Inta-Vir, Aktara or any other means for sucking insects (according to the instructions).
Advice! But in general, treatment against thrips need to carry out annually after digging the bulbs in autumn.

If desired, after the procedure for disinfecting the planting material, the bulbs can soak in growth stimulant solution (for example, Kornevin, Heteroauxin).
This is especially true if the sprouts germinate too slowly (or did not appear at all during the vernalization process).
Thus, thanks to the dressing of the bulbs in fungicidal and insecticidal preparations, as well as growth stimulants, you can prevent their diseases and pest damage, as well as accelerate their growth and flowering.
Answers to popular questions about preparing gladioli bulbs
Do I need to peel and process the bulbs in the spring if
this already done in the fall?
It is highly desirable to carry out these activities both in autumn and spring.
By the way! The site has a separate article about when to dig up and prepare the gladiolus bulbs (what to process) for winter storage.
Do bulbs need to be germinated before planting?
Makes no sense we sprout gladioli bulbs before planting them in the ground. After all, gladioli in the middle lane and without this preparatory event bloom quickly enough and have time to fully mature and lay flower buds.
Another thing is when it is really recommended to pre-germinate tubers, bulbs or rhizomes at home. anemones, dicenter, ranunculus, calla lilies, Cannes, freesia.
This might make sense if you have a very short and relatively cool summer.
Note! Of course, if the bulbs have sprouted during their storage, then they can and even need to be planted in pots with soil, and then transferred into open ground, into the garden (when weather conditions permit). But it is still better to put it in a cooler place (refrigerator).
What if the bulbs have sprouted ahead of time?
If the storage conditions are not followed, gladioli bulbs may begin to germinate prematurely. To contain their growth, you need move the bulbs to a cooler place, where the temperature is kept no higher than +4 degrees, for example, in the same refrigerator.
As a last resort, put them on germination in a pot of soil (sawdust, vermiculite, coconut substrate), and then carefully transfer to the open ground.
Note! Gladioli germinate almost instantly, in a few days they grow long roots. And if you damage them when transplanting into open ground, then in the future, new roots are no longer formed and the plant will develop worse.
Therefore, if you are going to germinate them, then it is better to do this in the ground, and not in sawdust, vermiculite, sphagnum moss or coconut substrate, in order to just transfer into the soil with an earthen clod, and not plant bulbs with long tangled roots, which you are likely to simply break off.
Can the bulbs be left untreated before planting?
If you confident in quality their bulbs, they are completely healthy - they do not get sick with anything (clean, without spots and any sores), and last fall you carried out their preventive etching and did not observe any problems at all, then you can not soak in anything.
But purchased (store) bulbs must be processed (pickled) without fail.
Another thing is, if you want to stimulate their early awakening and germination of the sprout, then it is advisable to carry out the process of vernalization (treatment with the sun), and also pickle in a solution of a fungicide, and then an insecticide, just before planting in a flower bed.
What should the bulbs look like when they are ready to be planted in the ground?
By the time of landing on the flower bed, the gladiolus bulb should have 3-5 cm sprouts and swollen root tubercles or already the rudiments of roots (3-5 mm).

What to do if the bulb does not hatch and does not germinate in any way?
Most likely, the bulb is too dry (overdried). You need to be sure to soak it in a growth stimulant, for example, Kornevin, Heteroauxin.
What if the bulb has a crooked sprout?
You have no choice but to plant the bulbs on their sideto curve the sprout was pointing up.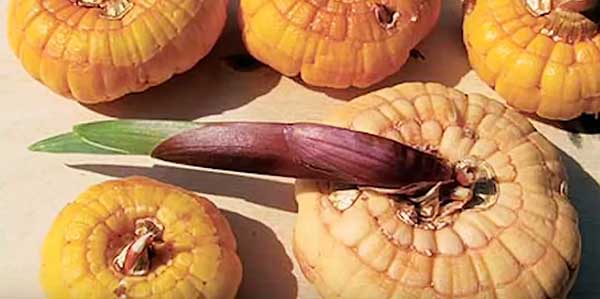
What if the sprout is elongated (it grew very long)?
On the bulbs, as a rule, in addition to the main central bud, there is a replacement bud (or even 2) nearby.Accordingly, you can gently break or trim the elongated sprout. Then a strong shoot will begin to actively grow and develop from the replacement bud.
If you leave a weak and elongated shoot, then the flowering of this plant will hardly please you.
Therefore, if your sprout has accidentally broken off (broken off), then there is nothing to worry about: the gladioli will wake up spare buds (there is no need to throw out the bulb).
When to plant gladiolus bulbs outdoors?
When the returnable spring frosts pass and the soil at a depth of 8-10 cm warms up to + 8-10 degrees, i.e. approximately, when you plant tomato seedlings in the ground (you can a little earlier).
Advice! More details about the timing and rules for planting gladioli bulbs in spring read in this material.
Thus, now you know that it is worth preparing gladioli bulbs for spring planting in a timely manner and correctly. Good luck!
Video: preparing gladiolus bulbs for planting